Make Your Mom A Gift That She Will Love
11 May 2018 | 4 min Read
Sejal
Author | 2 Articles
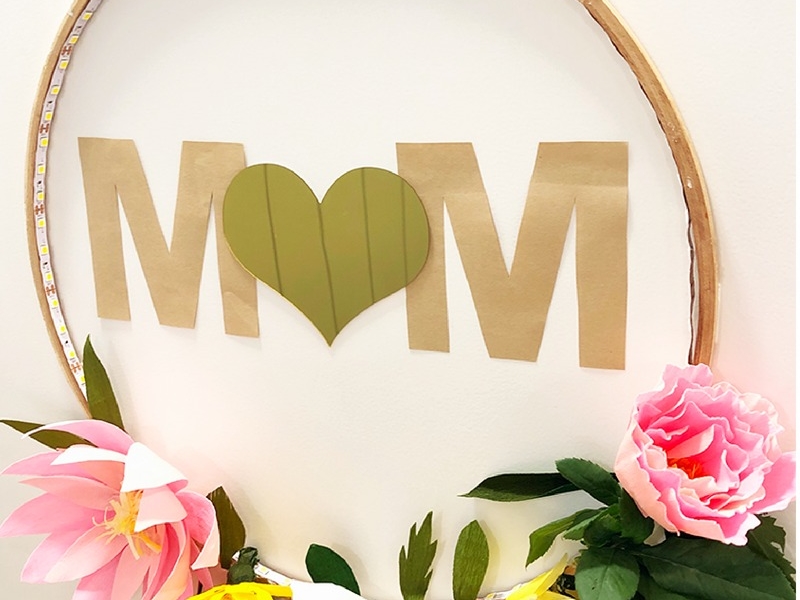
Mother’s Day is around the corner. It took me so long to make this DIY Floral Wreath Light that I didn’t realise that it’s already the weekend before mother’s day! So if you are looking for any last-minute DIY and Mother’s Day Party Ideas, I have them for you.
Since we are short on time, let me straight up give you a lowdown on this DIY Floral Wreath Light which I used it as the backdrop.


DIY Floral Wreath Light
Materials Needed
- Embroidery Hoop
- LED Striplight with Driver
- Duplex Paper
- Floral Wire
- Floral Tape
- Low Temp Glue Gun
- Scissors

STEP 1
I took the inside of the embroidery hoop to make the wreath but you can take either. If you want you could paint it, I chose to use it as is.
STEP 2
I had some strip light left over from a light in my bathroom so decided to use that. The strip light comes with a sticker backing and all you need to do is simply peel off the backing and paste it around the ring.
If you ring comes with the driver then you are sorted. In my case, I had to go to the hardware store to put the driver. It took only 5 mins to attach it to the light and the hoop. Once the light was on, the hoop transformed into a beautiful photo frame. By the way that is the easiest and cheapest gift, you can give anyone. Just spray paint the hoop in metallic gold and Voila its a perfect gift for anyone!
STEP 3
Now comes the real deal – The crêpe paper flowers. I would love to say this project is easy, but that would be a lie. If you have ever made paper flowers, you would know that it is time-consuming. In my case I had never made crêpe paper flowers so learning the art plus getting it right took more time than usual. But one thing I can tell you for sure is that it is the MOST satisfying craft I have ever done.
I am in love with crepe paper flowers and the fact that they last longer than the real stuff.


Peony
To make the peony, cut around 15-16 petals in the required shape. Make sure you are cutting vertically so that the grain in the paper will run vertically in the leaf.

Now take each petal and stretch it out by applying pressure with your thumb gently. In the image you can see 2 petals, one is before stretching and one after. You can keep your petals uneven and you don’t need to stretch it all the way through.
Stretch from the top part (broader part) of the petal.

Now make a slit at the end of the petal and glue it together so that it bends forward a little.

To assemble the flower, take the circle base and paste 6-7 petals around it. Follow the same method until you get the desired shape of the flower.
Now take about 1-2 inches of the yellow coloured paper and cut fringes across the strip. Roll the stamen and glue it together. Then glue the stamen to the centre of the flower.

Lastly, add the leaves of any shape you like. Cut them short and wide, or long and thin. It is up to your imagination how you want your wreath to look. So go all out and make as many flowers and leaves you like.
Waterlily
Apply the same method above for the waterlily except that the petal shape will be narrower and longer.

If you don’t have the time to DIY, you can totally make it by adding faux flowers. But If you can, I insist you make crêpe paper flowers. If you choose to gift them to your mom, she will be amazed at how creative and talented you are:-)
How about using the DIY Floral Wreath Light as a backdrop for a mystical spring party? Or hang it from the ceiling and let your guest use it as a photo frame for photo ops. Perfect for a sundowner. What say?
Disclaimer: All photographs in this article are original and belong to the author. Reproducing them in any form without the permission of the author will not be allowed.
Buy BabyChakra Products: http://babyc.in/l/XP5p Get 10% discount use code:10COM
A


Related Topics for you
Suggestions offered by doctors on BabyChakra are of advisory nature i.e., for educational and informational purposes only. Content posted on, created for, or compiled by BabyChakra is not intended or designed to replace your doctor's independent judgment about any symptom, condition, or the appropriateness or risks of a procedure or treatment for a given person.
